The Receptor Noise Limited (RNL) Ranked Filter performs noise reduction while preserving chromatic or luminance edges, and is an important step in the QCPA framework. Importantly, it is also able to reconstruct sharp edges in images which have undergone smoothing (e.g. acuity-correction smoothing). The latter function is particularly useful for clustering or Local Edge Intensity Analysis, where intermediate colours created by the smoothing process would interfere with the processing.
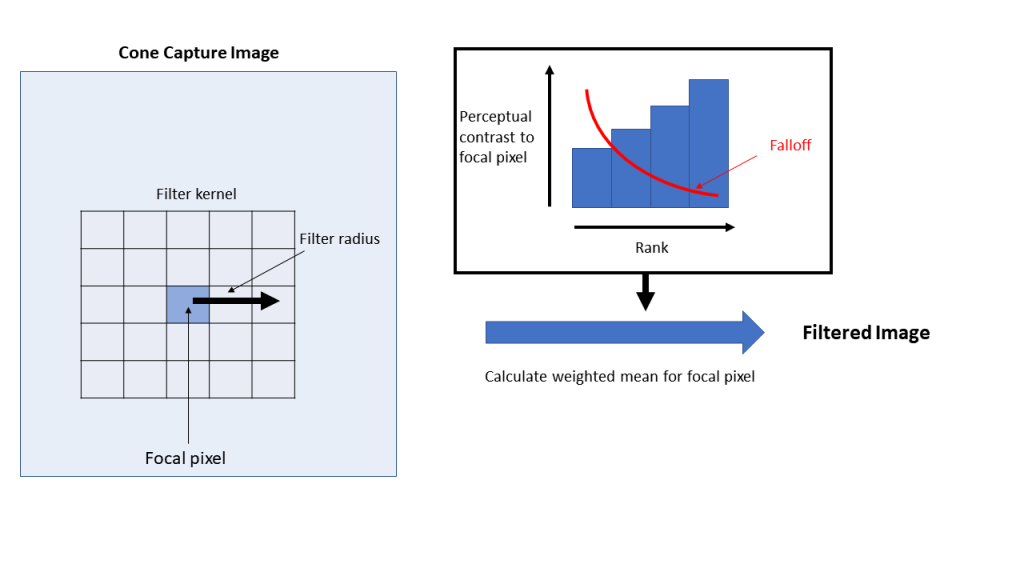
This filter compares each pixel in the image with its neighbouring pixels within a given radius. The pixels are compared in terms of chromatic and luminance RNL delta-S distances for di- tri- or tetra-chromatic images. The pixels within the kernel are ranked from nearest to furthest (in combined chromatic and luminance delta-S distance) from the focal pixel. The focal pixel is then exponentially smoothed with its neighbours, so that it is averaged most with the pixels of a similar colour and least with dissimilar pixels. The shape of the exponential falloff curve can be specified by the user, in addition to the kernel radius and photoreceptor abundance and noise levels. The filter can be repeated a number of times to enhance the effect and reconstruct sharp edges. The result of the filter is the smoothing of perceptually similar areas while maintaining or recreating edge information.
To combine this filter with acuity control, ensure the number of pixels per MRA match the radius of the RNL Ranked Filter. In practice a value of 5 is ideal; below this there is the potential for loss of spatial information, and above this the RNL Ranked filter is prohibitively slow.

Input Requirements
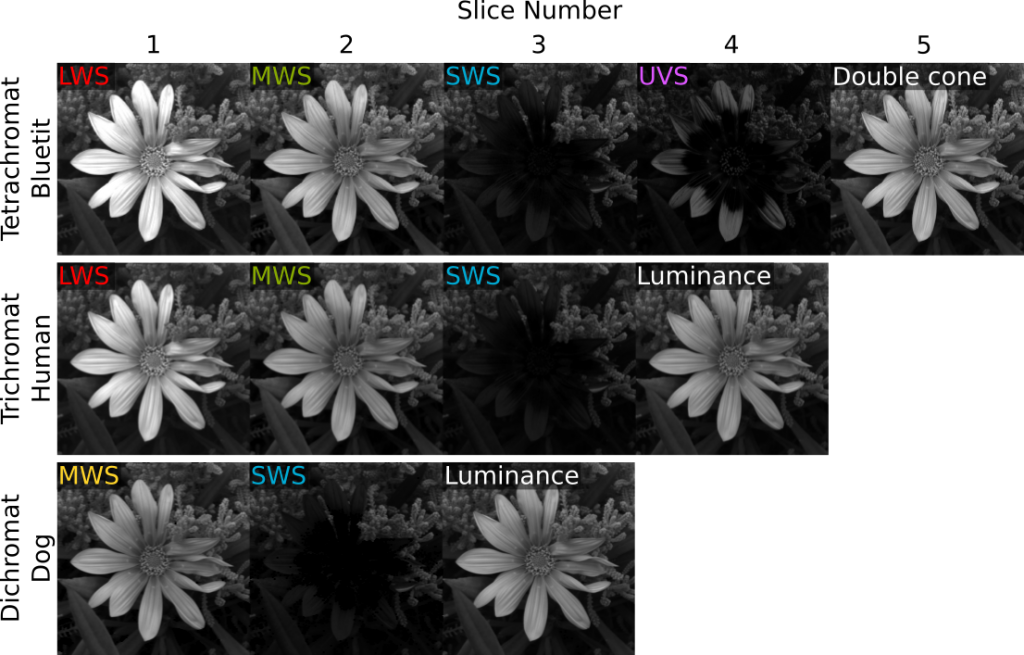
RNL clustering requires a cone-catch image stack. To create a cone-catch image you must generate or load a calibrated mspec image and convert to cone catch using a model. The first slices in the stack must be the chromatic channels, with a final luminance slice in the stack. Here are examples of input image stacks for tetra-, tri- and di-chromatic modelling:

If the cone-catch model doesn’t create a final luminance channel automatically (e.g. the “double” cones in birds), you will need to add your own. This will vary between visual system. There is a tool provided for adding a luminance channel.
plugins > micaToolbox > Image Transform > Create Luminance Channel
This tool adds a final luminance channel at the end of the cone-catch image stack, based on an equal average of all the selected channels.
Any pixel with zero values or negative values in any channel is ignored in processing (the RNL model can’t deal with them, but this is also a method for screening out sections of the image which you do not want to include in filtering).
Running RNL Ranked Filter
The filter is easiest to use within the QCPA framework. Simply run the framework and tick the RNL Ranked Filter box.
plugins > micaToolbox > QCPA > Run QCPA Framework

Alternatively the filter can be run on its own:
plugins > Measure > RNL Ranked Filter

| Weber fractions | Specify the desired Weber fractions for your visual system for each receptor class (there are based on cone abundance and receptor noise). If you use the QCPA Framework these can be selected automatically from a list of visual systems in the first dialog box. |
| Lum (Luminance Weber Fraction) | Specify the Weber fraction to be used for the luminance distance calculation (it uses the log “Siddiqi et al. 2004” method). |
| Iterations | Specify how many repeats of the filter to apply. We recommend 5 as there are diminishing returns past this number of repeats. |
| Radius | The kernel radius. Use a value equal to or just below the “pixels per MRA” value of the image if using this after acuity control. This will ensure the filter can reach across the area of blurred pixels at a boundary to reconstruct the edge. |
| Falloff | Specify the shape of the falloff curve used for exponential smoothing of the focal pixel with its ranked neighbours. 3 is a sensible number. Higher values create a steeper falloff curve, meaning the focal pixel is averaged with a smaller number of more similarly coloured pixels. Lower numbers flatten the curve, so that it eventually becomes a mean filter within the given radius. |
Output
The script simply outputs a filtered image.
